1. TYPING HEBREW ON PC/ LAPTOP
It is useful to learn how to type Hebrew on laptop or PC. One of the best Hebrew is the SBL Hebrew Font using SIL Layout (Windows). Click on this link to download and install SIL Hebrew Keyboard on your laptop
https://www.sbl-site.org/educational/BiblicalFonts_SBLHebrew.aspx
My Favourite Keyboard
Select the Hebrew keyboard driver to download depending on the laptop that you are using after you see this screen:
Personally, I prefer the SBL Hebrew Keyboard driver SIL Layout than the Tiro Layout.
You will see the Language has changed from ENG to עבר
(meaning Hebrew language)
Your physical keyboard will basically follow this layout:
This is why I like this keyboard layout. It is more userfriendly to people who are already familiar with the English keyboard.
Letters that are linked to the English keyboard
Most of the letters (except a few) follow the alphabet on the English keyboard. For example:
- S = Samech
- D = Daleth
- G = Gimmel
- H = Hey
- K = Kaf
- L = Lamed
- P = Fey
- Z= Zayin
Letters that you have to remember
A few letters, however, need to be remembered. For example:
שׁ shin, type j
שׂ sin, type f
ז zayin, type z
ח het/chet, type x
צ tsade, type c
ט tet, type v
What about Alif and Ayin?
- To type Alef, you press Shift button and the full stop / right arrow head key at the same time.
- To type Ayin, you press Shift button and the comma / left arrow head key at the same time.
Typing Dagesh and Sofit
- To type the dagesh, you just press the + key after the letter you want to pierce with a dot. For example, if you want to type Pey, you type P first, then press the + key to add the dagesh.
- To type the sofit, you press Shift button and the letter itself at the same time. For example, to type Kaf Sofit, you press Shift and the letter k.
Typing the Nikud
You basically follow the English keyboard.
You basically follow the English keyboard.
- To add Patah, you press the letter a
- To add Segol, you press the letter e
To add Tsere, you press the shift key and letter e
- To add Hiriq, you press the letter i.
- To add Holem, you press the letter o.
- To add Qubbutz, you press the letter u.
- To add Shuruq, you press the letter w (for the wav) and then add a dot in the middle by pressing on shift and typing on the + letter.
- To add Schwa, you press the letter colon key :
- To add a hataf patah to a Hebrew consonant, press the letters CTRL, SHIFT, Alt and letter a simultaneously after the consonant. The hataf patah will automatically appear below the consonant.
- For hataf segol, press the letters CTRL, SHIFT, Alt and letter e simultaneously after the consonant.
- For hataf qamat, press the letters CTRL, SHIFT, Alt and letter e simultaneously after the consonant.
2. TYPING CANTILLATION MARKS ON LAPTOP
Use Unicode. This is numbers that are assigned to each different cantillation mark.
05AB after the letter. Then press both "Alt" and "x" buttons at the same time.
Type this letter first.
ב
Then continue typing the number unicode 05AB. It will appear like this:
05בAB
Then press Alt and x buttons at the same time. The Ole will appear on top of Beth automatically for you.
There are several documents that you can download to explain to you the above. I find these two documents useful:
(a) https://unicode.org/charts/PDF/U0590.pdf
This will give you the full set of unicodes.
(b) https://www.sbl-site.org/Fonts/SBLHebrewUserManual1.5x.pdf
This will give you the full set of unicodes.
(b) https://www.sbl-site.org/Fonts/SBLHebrewUserManual1.5x.pdf
This also has the unicode for cantillation marks in Appendix B.
3. How to get this beautiful Hebrew font called Accordance Font?
Download the free font software and install on your laptop
After that you will see Accordance in your list of fonts in your Word document. You just have to click on this if you want to type using Accordance font.
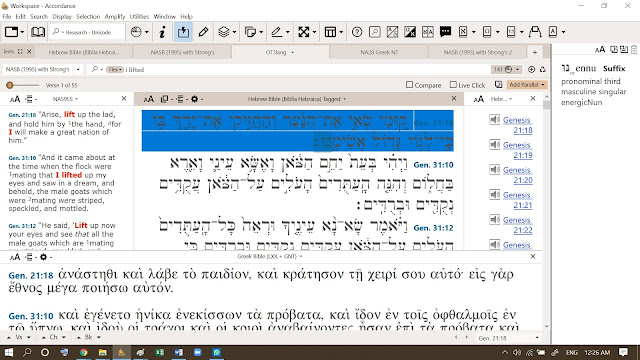
Gen. 21:18 קוּ֚מִי שְׂאִ֣י אֶת־הַנַּ֔עַר וְהַחֲזִ֥יקִי אֶת־יָדֵ֖ךְ בּ֑וֹ כִּֽי־לְג֥וֹי גָּד֖וֹל אֲשִׂימֶֽנּוּ׃
To circumvent this, I copy from my Accordance Bible Software first onto Microsoft Word, then copy the text from Microsot Word onto the blog.
After that, copy the text onto the blog post here. You will see the Accordance Font displayed beautifully on the blog post.
(Not sure if this simple tutorial would be useful for you)


No comments:
Post a Comment